Table of Contents

Horas
Horas is the third and most recent dimension in Mini World: CREATA. It was added in version 0.27.4, which was released on July 19, 2018. The player can travel to this dimension through a ![]() Teleporter Lvl 2.
Teleporter Lvl 2.
Overview
Horas has a plain, flat landscape, with the ground occasionally being split open by large cracks. The landscape of Horas offers quite little, other than a few ores such as fossils, ![]() Sardonyx, or
Sardonyx, or ![]() Tungsten. Horas' landscape is very easy to traverse through, especially with the use of vehicles or mounts, which will make exploration on this alien environment much more easier. The ground is very strong and even explosives will have almost no effect on it. Across the plains of Horas, you can find many of the altars like the ones you've spawned in. It is also occasionally dotted by bald gen wood trees of varying sizes, which can have
Tungsten. Horas' landscape is very easy to traverse through, especially with the use of vehicles or mounts, which will make exploration on this alien environment much more easier. The ground is very strong and even explosives will have almost no effect on it. Across the plains of Horas, you can find many of the altars like the ones you've spawned in. It is also occasionally dotted by bald gen wood trees of varying sizes, which can have ![]() Oxy fruits that can be used as a temporary source of oxygen. Almost everything visible when first entering the planet is gray.
Oxy fruits that can be used as a temporary source of oxygen. Almost everything visible when first entering the planet is gray.
Creatures
Rocki
Main page: Rocki
 The Rocki is a curious and silly little creature that can be found most commonly on Horas. It possesses a skull-like outer shell on its body and a large, singular eye in the center of its face. They are curious by nature and will break
 ![]() Smelting Tables,
Smelting Tables, ![]() Oxygen Refiner Devices and
Oxygen Refiner Devices and ![]() Incomplete Crafting Tables, probably in a failed attempt interact with them in some way, so keep those away from them. Rockis are skittish and will occasionally run around in fear whenever a player is near them. They also talk to other Horas creatures (except
Incomplete Crafting Tables, probably in a failed attempt interact with them in some way, so keep those away from them. Rockis are skittish and will occasionally run around in fear whenever a player is near them. They also talk to other Horas creatures (except ![]() Gravitis) when they are near. Rockis are not aggressive, but they will fight back when attacked. Their attack is a ranged attack where they throw bombs at you. These bombs are very dangerous, however, they can hurt the Rocki itself. Rockis will break Smelting Tables and Incomplete Crafting Tables. They will follow any players holding
Gravitis) when they are near. Rockis are not aggressive, but they will fight back when attacked. Their attack is a ranged attack where they throw bombs at you. These bombs are very dangerous, however, they can hurt the Rocki itself. Rockis will break Smelting Tables and Incomplete Crafting Tables. They will follow any players holding ![]() Yummy Corn Desserts, and you can tame them with those. When tamed, they will protect you by throwing bombs at creatures or monsters that are attacking you, but they can be dangerous to have as a pet since it can still damage you, the pet, and the environment around it, so be cautious when bringing it around on your adventures.
Yummy Corn Desserts, and you can tame them with those. When tamed, they will protect you by throwing bombs at creatures or monsters that are attacking you, but they can be dangerous to have as a pet since it can still damage you, the pet, and the environment around it, so be cautious when bringing it around on your adventures.
Frosti
Main page: Frosti
 The Frosti is a common creature that can be found throughout Horas. It has a head sprinkled with icy spikes, and its body is a bright blue colour, with a dark blue line in the middle. It has one, large eye in the center of its face. Its hands are canons, with which it uses to attack. Frostis will sometimes be passive, but they are mostly aggressive. Their ranged attack works by shooting an
 ![]() Ice Dart that makes you slow down when one hits you. Frostis can be tamed with
Ice Dart that makes you slow down when one hits you. Frostis can be tamed with ![]() Yummy Fruit Platters, and they will fight for you when a creature or monster attacks you. They will also chat with other Horas creatures (except
Yummy Fruit Platters, and they will fight for you when a creature or monster attacks you. They will also chat with other Horas creatures (except ![]() Gravitis).
Gravitis).
Bulli
Main page: Bulli
 Bullis are the most aggressive creature on Horas. They take the appearance of red cube-shaped creatures with a yellow stripe in the middle and a singular large eye, armed with horns on their heads, hence the name, Bulli. Bullis can cause a big danger when exploring the extraterrestrial landscape of Horas, as they are hard to escape from due to their charged attack. They are very aggressive and Bullis will always attack you. You can make a Bulli charge into a wall to stun it, giving you time to run away. Like Rockis and Frostis, Bullis will communicate with other nearby Horas creatures (except
 ![]() Gravitis). You can tame a Bulli by feeding it
Gravitis). You can tame a Bulli by feeding it ![]() Yummy Giant Buru Pie, but you can only feed the pie to scared Bullis! To scare a Bulli, damage it and another Horas creature until they are on low health, which will instinctively make them fuse. You should defeat the fused creature, as this will make them separate and you'll finally scare the Bulli and the other creature it fused with, and you'll have a few seconds to tame it! Once you've pulled it off, you'll have a loyal companion ready to protect you for your journeys on Horas!
Yummy Giant Buru Pie, but you can only feed the pie to scared Bullis! To scare a Bulli, damage it and another Horas creature until they are on low health, which will instinctively make them fuse. You should defeat the fused creature, as this will make them separate and you'll finally scare the Bulli and the other creature it fused with, and you'll have a few seconds to tame it! Once you've pulled it off, you'll have a loyal companion ready to protect you for your journeys on Horas!
Graviti
Main page: Graviti
 Gravitis are the biggest and by far the most dangerous kind of creature found in Horas. They can only be found in the Horas Floating Islands biome, where they pose a great danger to those who wish to travel the land of the floating islands! They have slow speed, but very high health and damage. Gravitis' ranged attacks will confuse the player, making them move in the opposite direction. However, Gravitis are most dangerous when they use their rooted attack. This attack will trap you inside purple chains that will drag you towards the Graviti who trapped you, while making you take a large amount of damage that ignores most armor. The damage alone will kill you if you don't heal, but the fall damage if it drags you off the edge of the islands or into the air can also be deadly. Gravitis do not communicate with their Rocki, Frosti, nor Bulli relatives. They also cannot be tamed. In general, it is best to avoid Gravitis at all cost when exploring the Horas Floating Islands, especially when looking for the precious Horas Copper or Purple Fluorite ores.
Squawker
Main page: Squawker
 The Squawker is an animal that can be found throughout Horas. These mutated chickens have a funny appearance, having a derpy face, googly eyes, and an always open beak. They can be dyed using
 ![]() Paintball Guns,
Paintball Guns, ![]() Small Easter Eggs, or normal-sized
Small Easter Eggs, or normal-sized ![]() Easter Eggs, which will also make them produce a squawking sound (hence their name). Hurting them will also make them squawk.
Easter Eggs, which will also make them produce a squawking sound (hence their name). Hurting them will also make them squawk.
Horas Merchant
Main page: Horas Merchant
 A mysterious merchant dwelling under the Horas islands. His main trading currency are
 ![]() Horas Shells, which are mysterious shells found through breaking fossils. This strange and kind old man has strange ears and a weird nose, meaning he is probably not a human. Maybe he is a member of the long lost civilization? But, who cares?! He's a nice old guy who sells you shells and useful stuff!
Horas Shells, which are mysterious shells found through breaking fossils. This strange and kind old man has strange ears and a weird nose, meaning he is probably not a human. Maybe he is a member of the long lost civilization? But, who cares?! He's a nice old guy who sells you shells and useful stuff!
Biomes
- Horas Plains: Horas plains is the basic description of Horas listed earlier. It is a long, expansive plain of horas rock, making up most of Horas. There are a good amount of ores to be found here, which could be
 Sardonyx Ores,
  Mysterious Fossils,
  Oil Blocks, and very rarely,
  Tungsten Ores. The biome has a few Bald Genwood trees scattered around. These trees can have
  Oxy fruits, which are a wonderful to have on Horas as they are a temporary source of oxygen, of which this planet has very little of. Their only drawback is that they don't taste very good and you'll lose some health when eating it. All Horas mobs can spawn here (except
  Gravitis), and Horas alters can spawn here as well.
 - Horas Floating Islands: The floating islands of Horas are beautiful biomes that contain the necessary resources for beating the game. Underneath, and sometimes on the surface of the island,
 Horas Copper and
  Purple Fluorite Ores can be found, alongside the other ores from earlier. You are also able to find
  Horas Spores, which are beautiful and colorful mushrooms that are spaced out from each other. These beauties' stems can only be collected with Intact rune enchanted items, but the top can be collected with any tool. These mushrooms come in different colors. Eating these horas spore mushrooms will give you a variety of effects, Flourescent, Dizzy, and Night Vision. You can also find Horas merchants residing underneath the island. Above the island, you can find varying colors of horas grass and lots of hills. The edge of these islands has horas clouds, which will break when stepped on, so be careful! You can also find much more brighter and nourished gen wood trees on the island. These trees bear more oxy and have branches. You can find Horas Copper and Purple Fluorite Ores here. Graviti will spawn in all Horas floating islands, but depending on the color of the grass, different creatures can spawn. White grass is the safest, rockis and squakers spawn frequently, with less Gravitis spawning. Blue grass means that Frostis will spawn there, and the spawn of graviti is normal. Red means Bulli will spawn there, and the Graviti spawn rates are still normal. This grass color should raise you some caution due to the Bulli's high knockback after charging at you. Purple grass means a lot of Gravits will spawn there. This the most dangerous type of grass color but is also a high-risk high-reward situation, since Purple Fluorite Ores are more common in these types of islands! But no matter which color, these beautiful islands are truly an amazing sight to behold, and their beauty will shine throughout Horas! But like anything beautiful in nature, it is also quite dangerous, so always be careful on a Floating Island!
Structures
Horas Altars
 Horas Altars are structures that can be found in the plains of Horas. These structures appear to be the remnants of an ancient civilization, one that is extinct. I must admit that this ancient civilization has good building skills, but putting that aside, these altars have many ancient statues in them. These statues are very strong, and must have served a very important purpose in the ancient civilization, though they are now not much more than just decoration. These altars include a small middle structure composed of three totems:
 Horas Totem - Sky
 Horas Totem
 Horas Totem - Earth
Out of all of these totems, the middle totem, being simply called “Horas Totem”, is the most important one. The middle totem is completely indestructible, and the first one you'll ever encounter will grant a large zone of oxygen, which lasts for 5 minutes. This is the inky place this block can be found. On the floor of the altars, you can find an opening to an underground part of the altars, containing a strange blue crystal. Breaking this crystal will make it drop random blueprints and Horas runes. This is the only way to obtain horas blueprints. This crystal is most likely some advanced way of storage developed by the ancient civilization.
Horas Merchant Shack
The simple home of the Horas Merchant, which cam be found under the Horas Floating Islands. It's a small structure with 2 Fluorescent blocks at the entrance. The interior contains 2 empty ![]() Storage Boxes, an
Storage Boxes, an ![]() Incomplete Crafting Table, and a
Incomplete Crafting Table, and a ![]() Smelting Table. The Horas Merchant can be found behind a column of
Smelting Table. The Horas Merchant can be found behind a column of ![]() Horas Rock Walls, that are unintendedly facing the wrong direction, because of most fences and walls being reworked in the Ocean Update.
Horas Rock Walls, that are unintendedly facing the wrong direction, because of most fences and walls being reworked in the Ocean Update.
Boss - The Ancient Colossus
Main page: Ancient Colossus
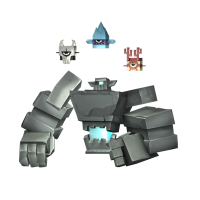
The Ancient Colossus is the third storyline boss of Mini World. He must be summoned around the Horas Altars, with a ![]() Tungsten Block, an
Tungsten Block, an ![]() Amber Block, an
Amber Block, an ![]() Horas Copper Block, and a
Horas Copper Block, and a ![]() Purple Fluorite Block.
Purple Fluorite Block.

First phase
In the boss's first phase, he has 3 minions with him. Their information will be shown below. The boss will slam onto the ground 3 times, sending you into the air to deal fall damage. On the last slam, it uses both its arms, creating a more powerful shockwave. To avoid this attack, you need to jump when he slams the ground. This attack will also affect any creatures on the ground, which can cause the added dangers of merged horas creatures. The best way to completely counter the attack is by having any immunity to falling damage. When he does this attack, he will glow red, blue or green. Attack the genesis minion of the corresponding colour to do damage to the colossus. Killing all his minions will also cause him to transition to phase 2. When any of these minions are defeated, the others will get buffs such as strength.
- Genesis Rocki (White): The Genesis Rocki will shoot out around five large, and powerful Rocki bombs per attack.
- Genesis Frosti (Blue): Genesis Frosti shoots a barrage of ice darts at you. These leave ice on the block they hit and can easily make the arena harder to move around on if not dealt with properly, but it is weak and can be broken by many means.
- Genesis Bulli (Red): Genesis Bulli will fly towards you once it spots you. It has high damage and gives the Bee Venom LVL 2 status effect to its targets. If it can't catch up to you for a while, it will occasionally shoot its Bulli projectile and potentially deal burning damage to you. It's best to take this minion down first.
Second phase
Once the Colossus is down to his 2nd phase, his moveset changes, and all the pillars from the altars will spawn around the arena. His main attack now insists on shooting a laser beam at you. This beam does very high damage and sets you on fire. This attack destroys most blocks in the game. Touching the area where the beam landed will deal damage to you. He can also do a melee attack if you get too close to him. The Colossus still has a sheild and can not be dealt damage while ots activated. To deactivate it, you must pay attention to the following information: Every so often, the Colossus's core and the ![]() Horas Totem - Earth on the altar pillars will glow different colors. To temporarily break the Colossus's shield, you must destroy the correct colored horas totems. They must be broken with a horas copper drill, but if you don't have one, you can trick the Colossus into shooting them with his beam. Breaking the incorrect colored statues causes nothing to happen, but failing to break the correct one in time will cease your opportunity to attack. Breaking the correct statue will temporarily stun the Colossus, making him unable to attack you and breaking his shield. You should deal as much damage as you can to the Colossus in this state, and quickly, as he will gain his shield and attacks back soon! The color of its core will also change the beams' behavior.
Horas Totem - Earth on the altar pillars will glow different colors. To temporarily break the Colossus's shield, you must destroy the correct colored horas totems. They must be broken with a horas copper drill, but if you don't have one, you can trick the Colossus into shooting them with his beam. Breaking the incorrect colored statues causes nothing to happen, but failing to break the correct one in time will cease your opportunity to attack. Breaking the correct statue will temporarily stun the Colossus, making him unable to attack you and breaking his shield. You should deal as much damage as you can to the Colossus in this state, and quickly, as he will gain his shield and attacks back soon! The color of its core will also change the beams' behavior.
- Red (or redder, since his beam is already red): Has increased knockback and damage.
- Blue: Slows you down.
- White: Creates an explosion and a portal on contact. The portals will repeatedly cause explosions when touched.
Once you've gotten the Colossus to around a third of its health, it'll enter its third phase.
Third phase
Once in the third phase, he will roar and destroy all the pillars. He will start his new attack pattern. First, he launches a barrage of ice crystals in a similar, more deadly version of the Genesis Frosti. Then, he will shoot a large wave of bombs, just like the previous ice crystal barrage. It is a stronger version of the attack from the Genesis Rocki. After this, he shoots a laser, and will shortly start charging up another attack. In this state, the altar pillars will appear, though much farther away from the center. Do the sane thing as in the original phase: break the corresponding colors to temporarily break his shield and stun the Colossus. However, if one fails to destroy the correct pillar in time, the colossus lets out a massive circular barrage of “Stone Tsunami” projectiles, that do insanely high damage and must be avoided at all costs. After his stun is finished, or if you run out of time, the Colossus will continue his same attack pattern, ice darts, and Rocki bombs.
Death
Once his health is reduced to 0, the Colossus will finally be defeated, and he will… thank you? Turns out the Colossus was being held against its force by the power of the Void, and is too damaged to be repaired, so by defeating it, you've saved him from his suffering. Once the Colossus is freed, the environment returns back to its original state, with the toxic block arena turning back into ![]() Horas Rock and it will repeat this sequence, replacing any blocks on the ground with horas rocks every time the area is loaded. It also creates a small structure made of horas rock, and in the center, lies the center part of the horas altars shown earlier, composed of an
Horas Rock and it will repeat this sequence, replacing any blocks on the ground with horas rocks every time the area is loaded. It also creates a small structure made of horas rock, and in the center, lies the center part of the horas altars shown earlier, composed of an ![]() Horas Totem - Sky, an
Horas Totem - Sky, an ![]() Horas Totem, and an
Horas Totem, and an ![]() Horas Totem - Earth. Sadly, this totem can not be activated, but it will give out a cool purple beacon beam! You will also get a golden clay jar, that contains a number of useful items! Mainly the
Horas Totem - Earth. Sadly, this totem can not be activated, but it will give out a cool purple beacon beam! You will also get a golden clay jar, that contains a number of useful items! Mainly the ![]() Stoneman's Eye and its
Stoneman's Eye and its ![]() core. The Stoneman's Eye is used to activate its corresponding plinth in the volcano, and finally summon the Void Phantom. The Giant Core can be used as a Celesthium gadget, that shoots a laser beam, similar to the one from his second and third phase, dealing 10 damage every second. It will also activate Celesthium blocks, basically making it the original light beamer. The usage for the Giant Core doesn't stop there though, it can be used to make tools as well, the most useful being the
core. The Stoneman's Eye is used to activate its corresponding plinth in the volcano, and finally summon the Void Phantom. The Giant Core can be used as a Celesthium gadget, that shoots a laser beam, similar to the one from his second and third phase, dealing 10 damage every second. It will also activate Celesthium blocks, basically making it the original light beamer. The usage for the Giant Core doesn't stop there though, it can be used to make tools as well, the most useful being the ![]() Energy Pulse Bow. You can also make the
Energy Pulse Bow. You can also make the ![]() Plunger Crossbow and the
Plunger Crossbow and the ![]() Reflector.
Reflector.